
Deploying Ruby on Rails with Chef 12 & AWS OpsWorks
Having a reliable and automated way to deploy your Rails app is essential these days. Our roles as developers are increasingly blurring the lines between software engineer and DevOps. There are plenty of PaaS options for simple deployments, but when you want to fine tune your application configuration, your monthly bill will start to grow.
Thus, my stack of choice for deploying Rails applications is OpsWorks, AWS’s implementation of Chef automated instances. In this article, I’m going to walk you through how my company sets up instances and automates deployments for performance, reliability, and simplicity.
Creating Your Chef Cookbook
AWS OpsWorks actually includes a built-in cookbook for Ruby on Rails if you use their Chef 11 Stack. However, we soon discovered that every time an instance on a layer is booted, the Configure lifecycle event is triggered. For the provided cookbooks, this means all of your Rails servers on all of your instances are going to restart at once; goodbye zero-downtime deploys. Our Airbrakes were going wild on all of our autoscaling events.
So we switched to custom cookbooks on a Chef 12 Stack, which guaranteed us completely pristine recipe slots on Lifecycle events; no default AWS recipes would be run, only the ones we selected.
Setting up a custom cookbook is pretty simple with ChefDK. On MacOS, you can install it with Homebrew.
brew cask install chefdk
Then, using the chefdk command line tool, generate a cookbook.
    $ chef generate cookbook rails_app
    Generating cookbook rails_app
    - Ensuring correct cookbook file content
    - Committing cookbook files to git
    - Ensuring delivery configuration
    - Ensuring correct delivery build cookbook content
    - Adding delivery configuration to feature branch
    - Adding build cookbook to feature branch
    - Merging delivery content feature branch to master
Switch to the rails_app directory that’s just been created. The cookbook includes a Berkshelf configuration for managing cookbook dependencies. We can simply edit the Berkshelf file to add support for the opsworks_ruby cookbook.
source '[https://supermarket.chef.io'](https://supermarket.chef.io')

metadata

cookbook 'opsworks_ruby'
Then, similar to Bundler, we just run berks install to install the cookbook dependencies. For most rails applications, this is all that’s needed for a custom cookbook. If you need advanced configurations, such as background jobs, or you want to select which appserver stack to use (puma, postgres, and nginx are the defaults), this cookbook provides a very simple way to use JSON configurations to customize which we will look at later.
You then want to publish this cookbook so that OpsWorks can download the source. The easiest way is with GitHub. I prefer to use S3. OpsWorks works with both. If you use github, just initialize a git repo inside the cookbooks directory and push it to GitHub. If you opt for S3, here’s a simple shell script to compile and upload the cookbook to S3. This assumes you have already created a bucket on S3 to house your compressed cookbook archives.
    berks update
    berks package
    export STACK_ID="xxxx-xxxx-xxxx-xxxx"
    mkdir -p tmp/product
    yes | rm tmp/product/cookbooks.tar.gz
    yes | mv cookbooks* tmp/product/cookbooks.tar.gz
    aws s3 sync tmp/product s3://your-cookbooks/rails_app
    aws opsworks --region us-east-1 create-deployment --stack-id $STACK_ID --command "{\"Name\":\"update_custom_cookbooks\"}"
    yes | rm tmp/product/cookbooks.tar.gz
Now that we’ve setup our cookbooks, we can move on to configuring an OpsWorks Stack.
Configuring AWS OpsWorks
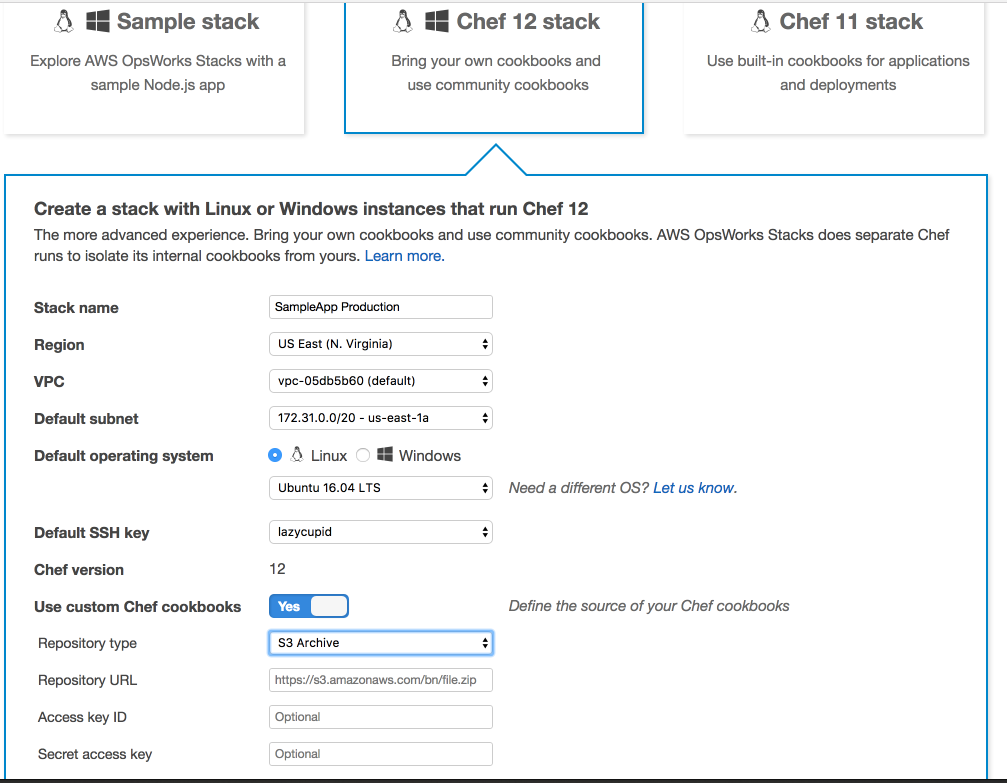
First, navigate to OpsWorks on AWS, and choose the default Chef Stacks option (not Chef Automate). Then click the Add stack button.

By default, AWS will show you the Chef 12 Stack option. Edit the configuration. Select Ubuntu 16.04 as the default operating system, and make sure you enable **Use custom Chef cookbooks. Paste in the full public URL path to your cookbook archive on S3. **If you set your S3 bucket to be public, you don’t need to supply AWS API credentials. If not, put your access keys in the box. If you opted to use a GitHub repo instead, supply the SSH address of the repo git@github.com:youruser/cookbooks and the the private key half of a deploy key for the repo.
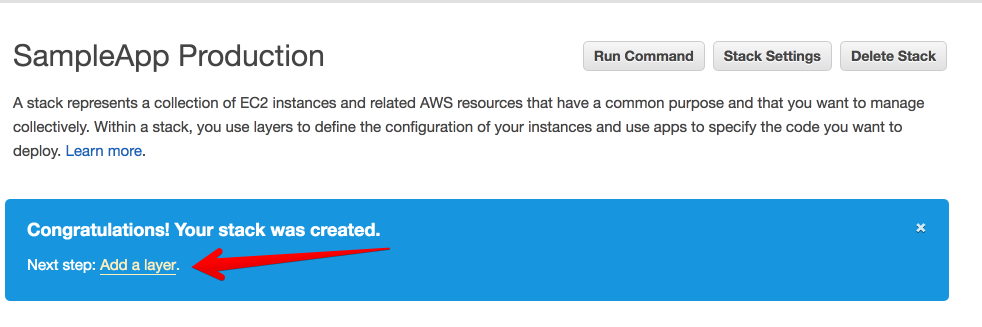
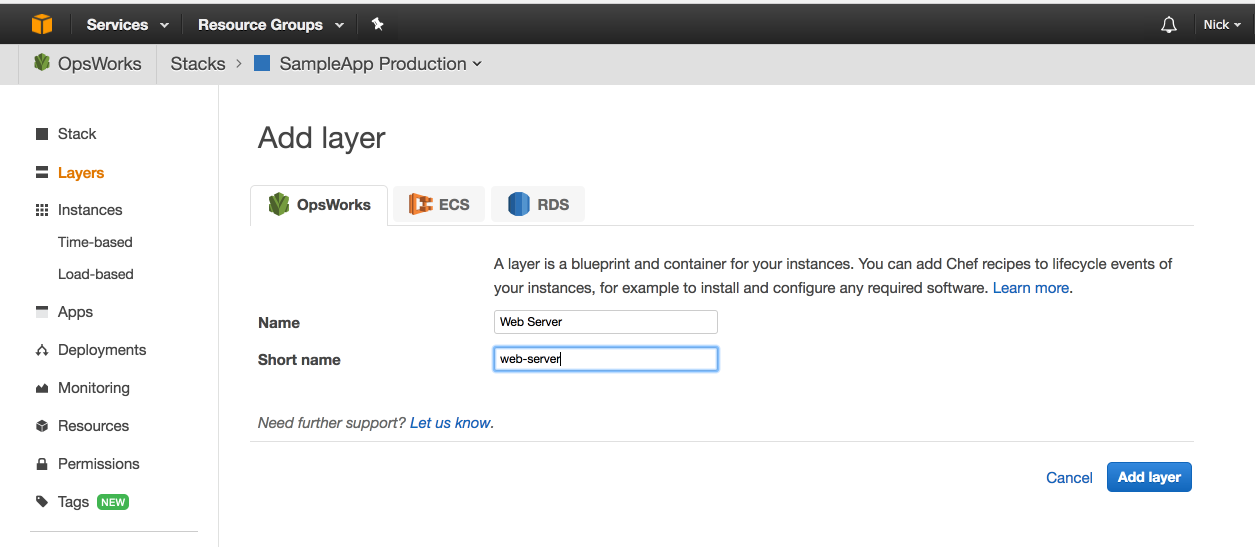
Next, we will want to add a Layer. This is where the Rails specific configuration will live. Our Stack represents the entire app infrastructure: database connection, rails app, background workers, redis instances, and whatever other servers you’ll need to support your app. Each of those categories becomes a layer, and each layer will have instructions on how to configure and deploy from specific Chef recipes.

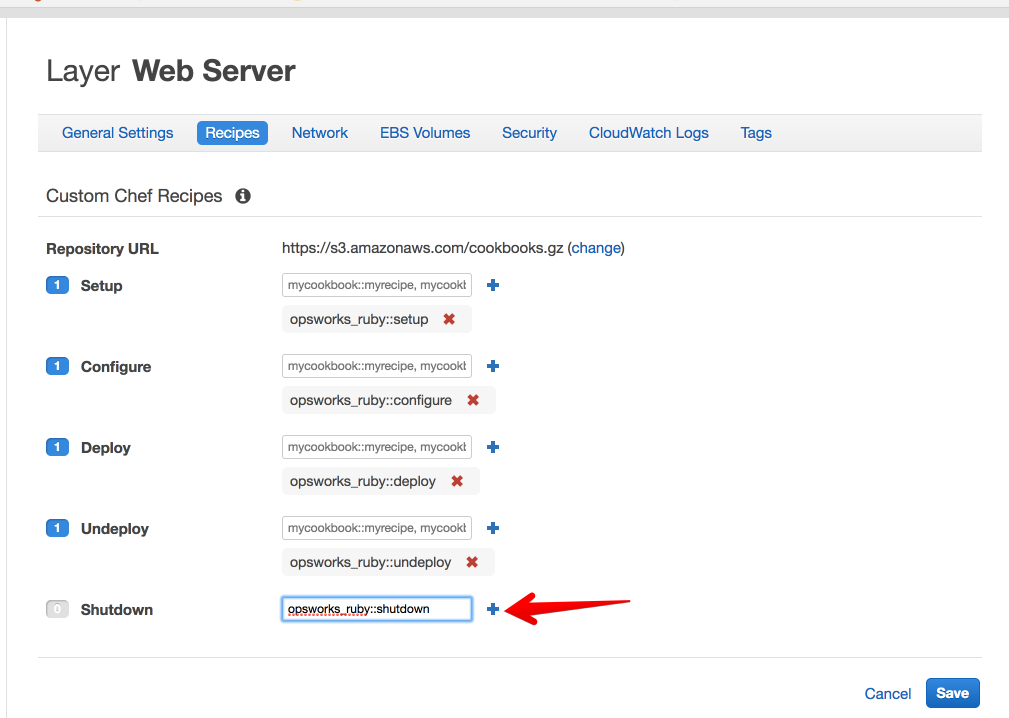
Now we will configure the Chef recipes for the layer. Click the Recipes link on the Web Server layer panel. The opsworks_ruby cookbook includes recipes for all of the Layer’s Lifecycle events (setup, configure, deploy, undeploy, and shutdown). Enter them as show (opsworks_ruby::setup, etc) and make sure you click the Plus button next to each input to ensure they’re added. Click Save, and we can move on to configuration the App section.
The App configuration in OpsWorks is where all the sensitive configuration data lives. A Chef cookbook for AWS OpsWorks can be completely absent of all sensitive data, and you can even publicly host them on GitHub if you set them up like this. All of the secret credentials (Git credentials, private keys, database configuration, environment variables, API tokens, Rails secret key) can all live in the Apps section in OpsWorks. Other sensitive configuration information can be passed in through Custom JSON if necessary. A well-written cookbook needs to know nothing about a specific app configuration.
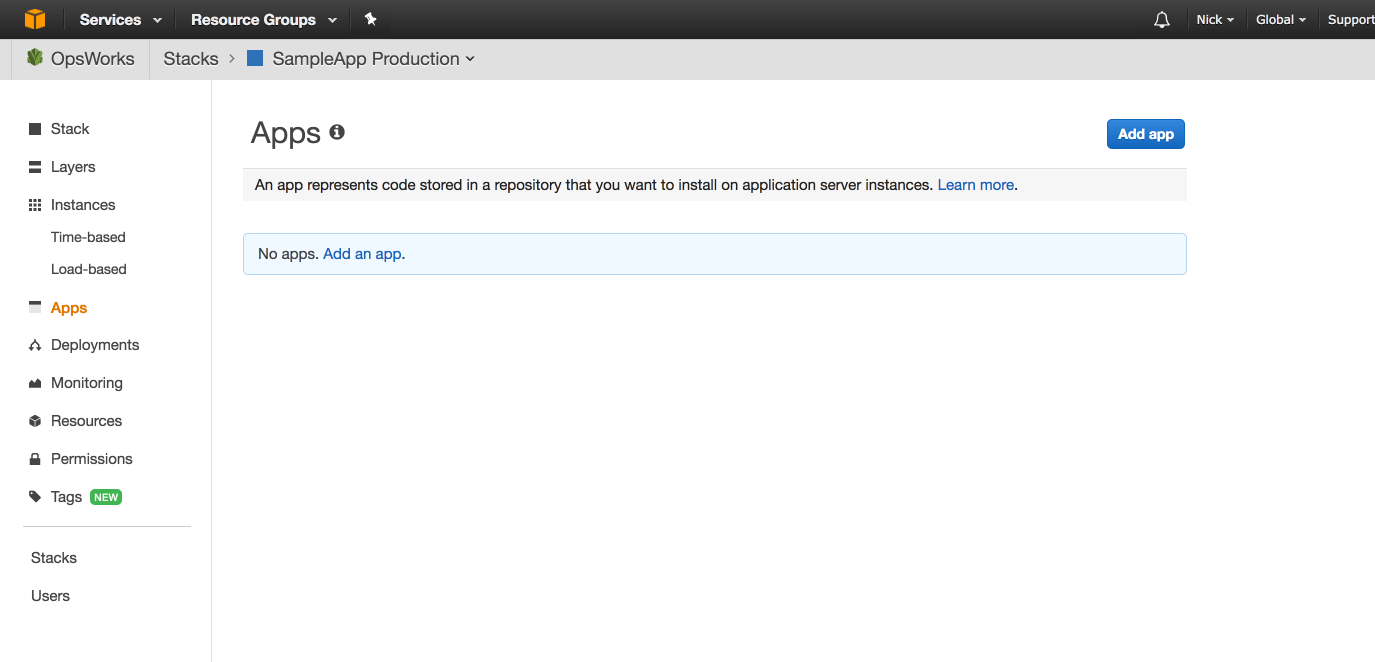
So, let’s create an App and configure it.
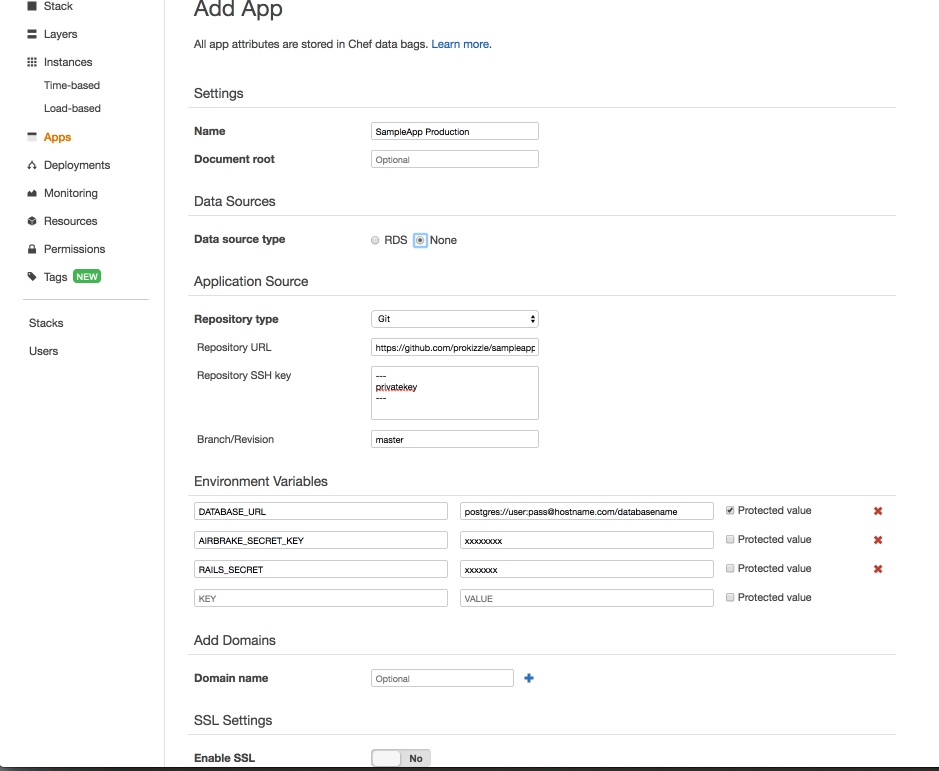
Pretty much everything here matters. The App name will be converted to a shortname and used in the path to the source. SampleApp Production will mean the app will be created in /srv/www/sampleapp_production/current. Document root should point to the relative public directory in your rails app. Nginx will use this data. Data Source is for the database. You can add an RDS layer if your database is on AWS RDS, and select it here. If you use an external database, leave this off, and supply the DATABASE_URL environment variable to the postgres URI of your database.
Supply your git repository information, including the branch name and private key portion of a GitHub deploy key for the repo. Add any environment variables here that your app needs. RAILS_ENV and RAILS_SECRET are both necessary to run a modern rails app. Save it, and let’s move on to instances.


Click on Instances from the sidebar, and then click Add an instance. The name and default availability zone will be filled in for us. The default instance size is c3.large. For a small Rails app, a t2.small or t2.micro might work well. But if you have a lot of gems, you’ll probably run out of memory on deployment for these. Take a look at the different instance sizes, and pick what’s best for your app. Click Add instance, and on the next screen, click Start next to your newly created instance.
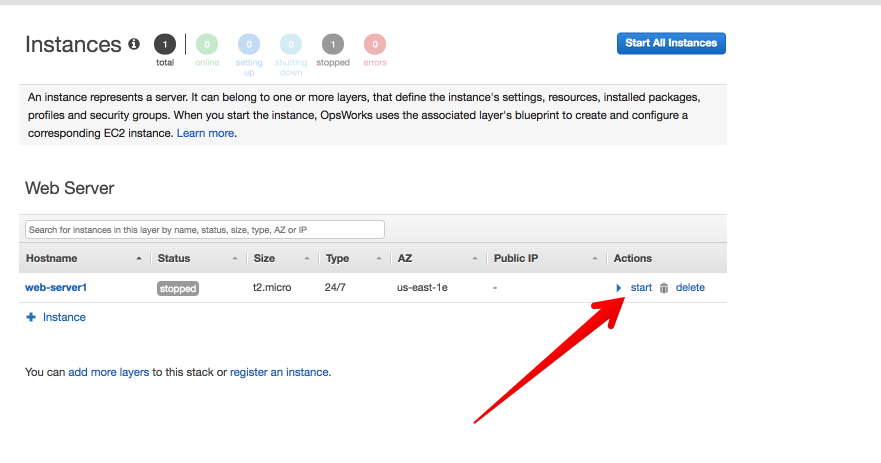
What happens next is configured in the Chef recipes. On start, AWS will boot up an EC2 instance. Then OpsWorks will run all of the recipes in the Setup and Configure Lifecycle events. After the instance is done with setup and online, head over to Apps to kick off a deploy.

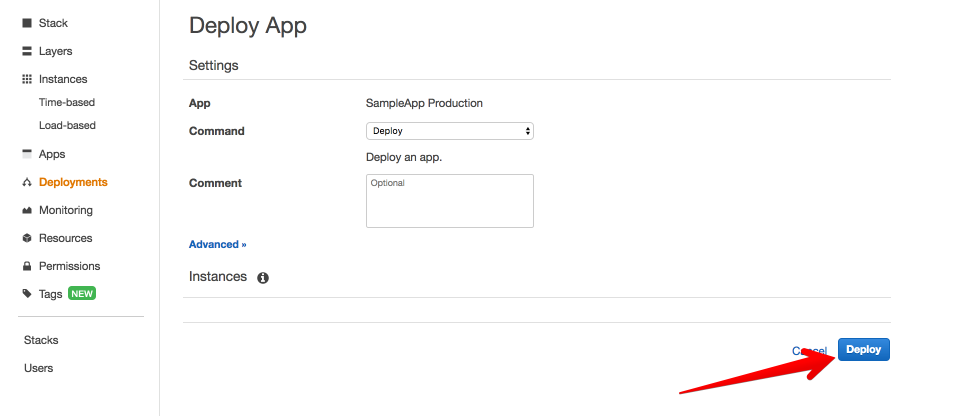
This will kick off the opsworks_ruby::deploy recipe, and your rails app will sync with GitHub, bundle, and come online. After every subsequent deploy, source will update, bundler will bundle, migrations will occur if necessary, and the appserver will restart.
Add a Load Balancer
Now that you have a layer with multiple instances, you’ll want to load balance these instances. I recommend using EC2 Load Balancers, which I will cover in a future article.
Once you have the Load Balancer setup, come back to OpsWorks and enter the Network settings for your Web Server layer.

You will be able to select an Elastic Load Balancer, and then your instances will have a balanced web address.
The next steps are to setup Continuous Integration using Codeship, which I plan to write about next. If you have any questions, feel free to reach out and I will help with what I can.